This post describes how to use Canva and GIMP to create an animated GIF file containing text only that can be attached to a tweet or uploaded into a Blog post. It’s only one of many ways to create an animated GIF.
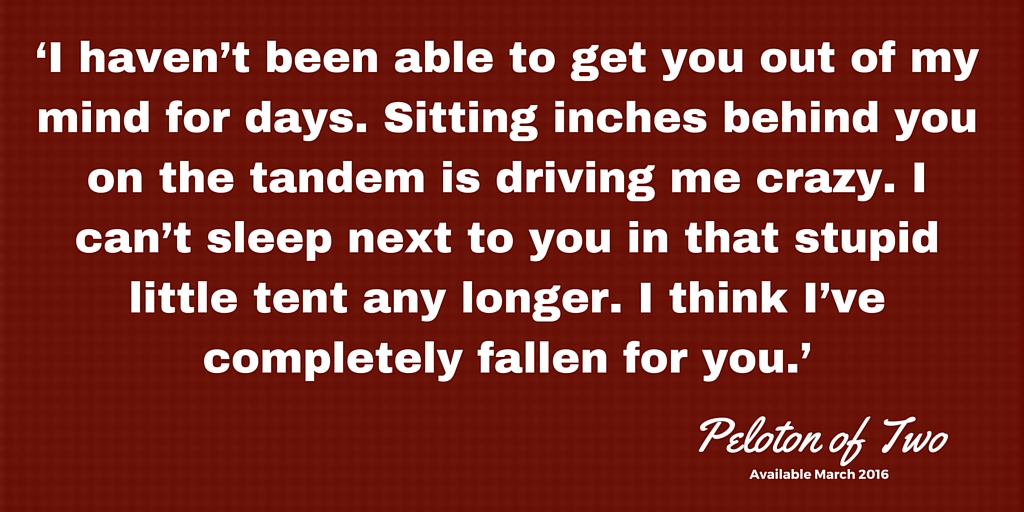
To walk through the process I’ve chosen to create an animated GIF composed of a four slide text transition. Each slide will contain a different sentence spoken by Catherine Pringle, a character from my novel, during the scene where she declares her love for the person she is sharing a tandem ride with.
The full extract of dialog is shown here on a jpeg image I created earlier using Canva:
The GIF will be created in two steps: create 4 separate slides using Canva; then assemble the slides into an animated GIF using GIMP.
The summarised steps are:
Use Canva to create a series of individual slides
- Log in to Canva. (It’s free to set up an individual account.)
- Start a new design by clicking on Create a Design.
- Choose a template from the list of design templates. In this case, I selected Twitter Template.
- Choose from the list of existing designs or build your own using the Elements, Text, Backgrounds or Uploads options. (Take care. Not all of the pre-existing templates are free. If you don’t want to be billed, then make sure that you only select free elements, or build the design yourself.)
- Build your first slide in the transition by adding the text you have chosen. Save your design using File, Save
- Duplicate the slide using the Copy Image button to the right of your design. Edit each slide so that the you have one slide for each of your planned text transitions. For example, there are 5 slides in my example.
- When you have the slides looking the way you want them, download them by choosing Download, Image for Web. This creates a zipped folder in your download area with a set of jpg files, one for each slide.
Use GIMP to convert the individual slides into an animated GIF
- Open GIMP. (If you don’t already have it installed on your computer, you can download it here.)
- Open the individual slides as separate layers in a new GIMP file.
- Select File, Open as Layers.
- In the Open as Layers dialog box navigate to the folder on your computer where the individual slides are. Highlight all of the jpg files then click on OK.
- Look in the Layers window and check that the layers (i.e. the individual slides) are listed in the correct order. They should be listed with the first at the bottom and the last at the top.
- Add the number of seconds a slide should be displayed for before the next slide appears.
- This is done in the Layers window, by editing the name of each layer. Add in brackets the number of milliseconds before the next slide appears. For example: if layer 2 is named 2.jpg and you want a 3 second delay between slides 2 and 3, then rename layer 2 as 2.jpg (3000ms).
- Save the GIMP file at this point with a .xcf extension.
- Convert the file to an animated GIF.
- Optimize the file for GIF.
- There are several options here depending on the nature of each slide. In this example the slides are identical except for additional text on each slide, so the best option is to use Optimize (Difference). This will remove duplicated elements in each slide and result in a smaller GIF file size.
- Select Filters, Animation, Optimize (Difference). This opens a new copy of the file and optimizes it.
- Create the GIF file by selecting File, Export.
- In the Export dialog box, add the name of the file you want and be sure to give it a .gif extension, then click on OK. This opens a GIF dialog box.
- In the GIF dialog box, be sure to check the As Animation checkbox. Also check or uncheck the Loop Forever checkbox depending on your requirements. In my example, I have set the GIF to loop forever.
- Click OK and the file is saved. You can test the file in a variety of ways: open in your browser; or, depending on your operating system, double click the file in your file manager.
- Optimize the file for GIF.
The result
The final animated GIF looks like this:
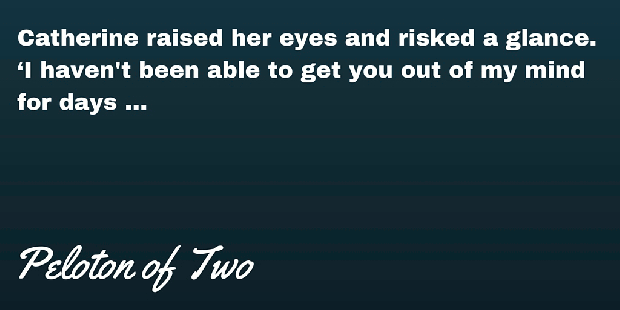
The result is pretty basic because my artistic skills are limited. But in a sense, that’s the point: it may not look much, but it was very quick and easy to create. For Twitter the maximum file size for an animated GIF is 3MB.